Top Tools For Creating Dragon Scale Resin Art
Essential Materials
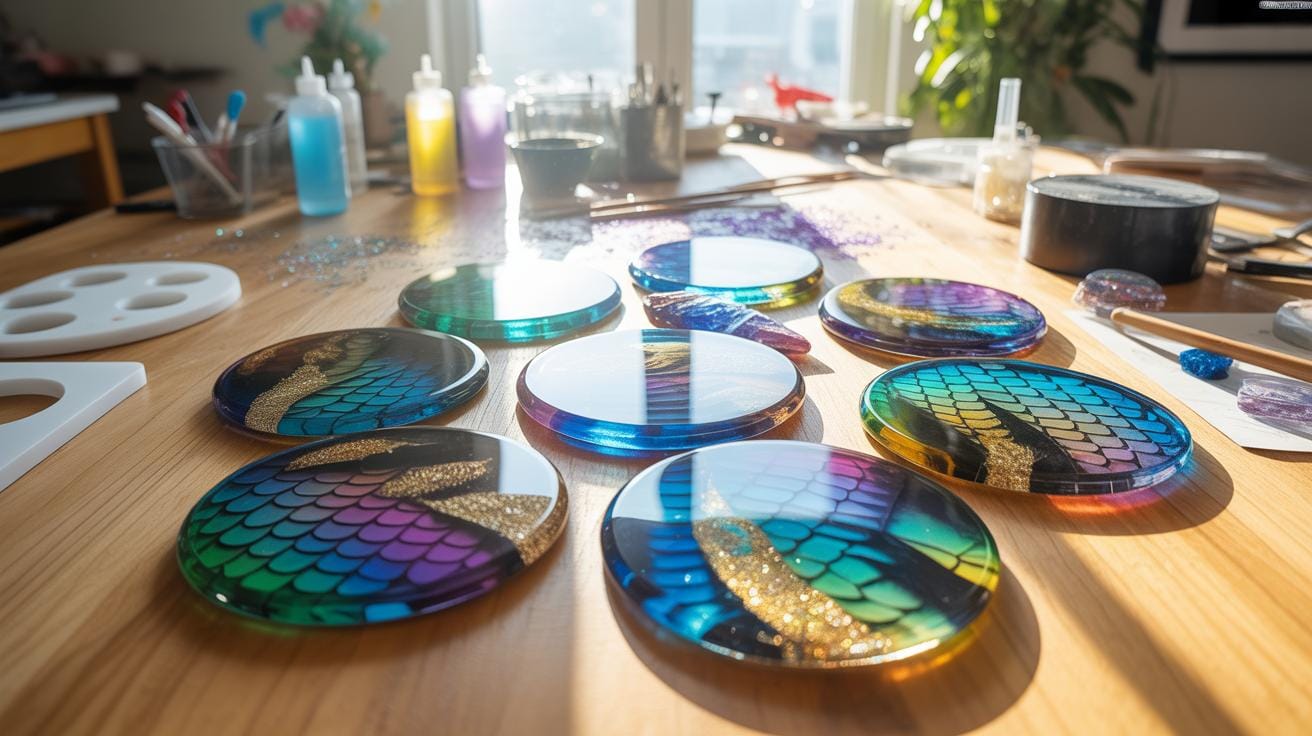
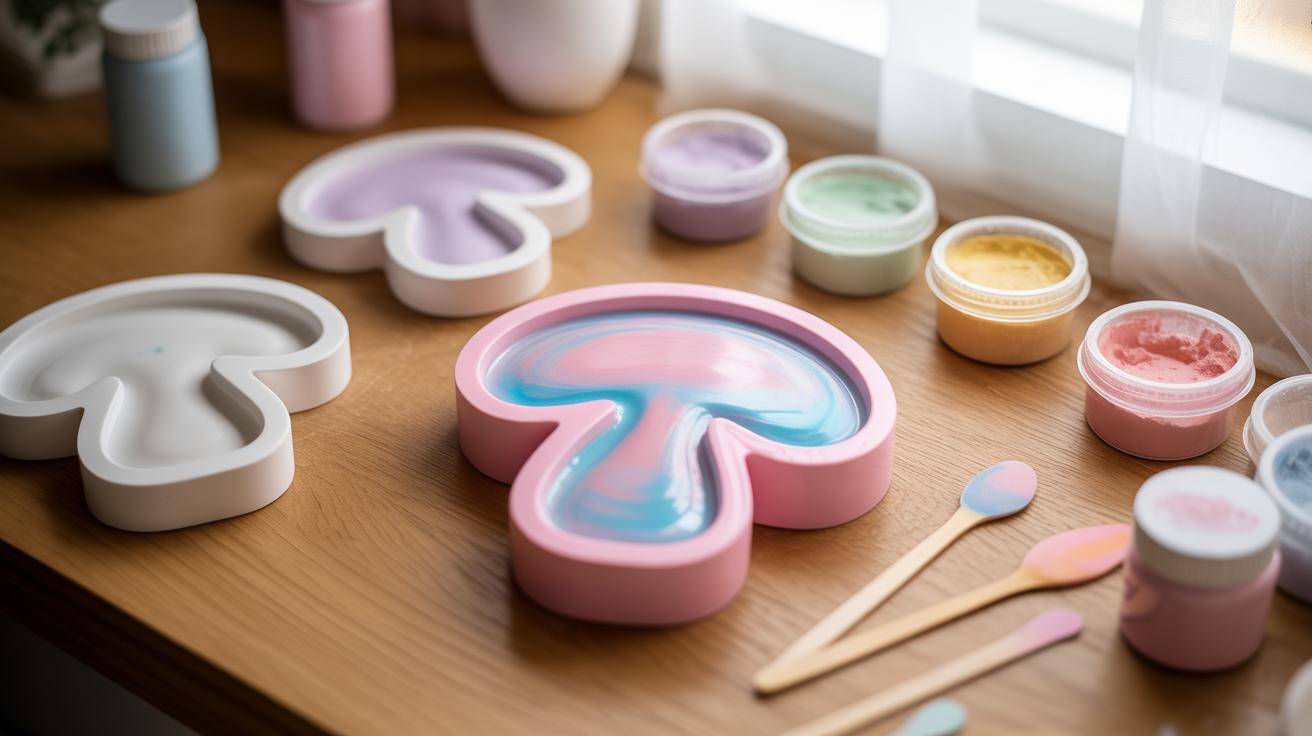
A successful Resin Pour requires specific hardware to mimic biological textures. You need a dedicated Dragon Scale Mold to ensure the geometry is consistent across the surface. These molds feature recessed grooves that capture pigment and create depth. High-quality silicone is necessary to prevent tearing when de-molding complex Dragon Scale patterns. Choose materials that handle high heat if you plan to use a torch for bubbles.
- Two-Part Epoxy Resin: Select a thin-viscosity resin for your Dragon Scale Resin project. Low viscosity allows the liquid to flow into the tight ridges of the Brown Dragon Scale Mold without trapping air. High-clarity formulas prevent yellowing over time.
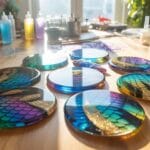
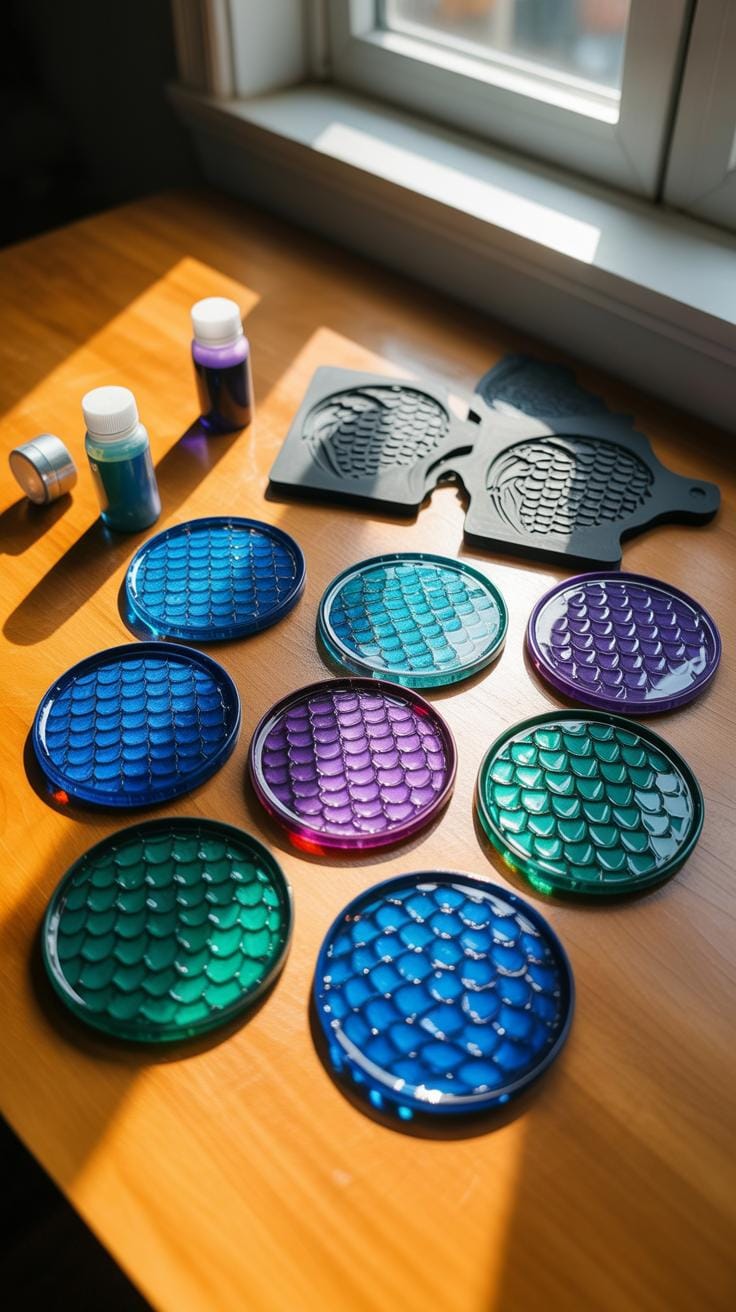
- Mica Powders and Alcohol Inks: Use these to create realistic Handmade Dragon Coasters with metallic shifts. Mica powder settles into the texture of the Dragon Scale to highlight the physical edges. Alcohol inks provide depth through transparency and layering techniques.
- Silicone Dragon Scale Mold: This tool is the foundation of any Dragon Scales Diy project. Geometric precision in the mold allows for light refraction that mimics real reptilian skin. Ensure the mold is rated for multiple uses and high-temperature resistance.
- Precision Stir Sticks and Mixing Cups: Accurate measurements are non-negotiable for a proper cure. Use graduated cups to maintain the exact mixing ratio required by the manufacturer. Small stir sticks help reach the bottom of the cup to eliminate unmixed pockets of resin.
- Fine-Point Pipettes: These allow for targeted placement of color during the Resin Pour. Use them to drop contrasting inks into specific scales for a more detailed Cosplay Dragon look. They offer control that pouring from a large beaker cannot provide.
Organization is critical when performing a Dragon Scale Resin project. Set up your workspace before mixing chemicals to avoid mid-process delays. Having your Dragon Scale Mold clean and level prevents lopsided results. Use a heat gun or torch to remove surface tension bubbles quickly. Proper preparation ensures your Dragon Scales Diy attempt results in professional-grade Handmade Dragon Coasters that look authentic.
Safety First Resin
Safety equipment protects your lungs and skin from chemical sensitization during a Dragon Pour. Epoxy resin releases fumes that can cause long-term health issues without proper ventilation. Use a respirator with organic vapor cartridges when working in confined spaces. Wear nitrile gloves to prevent direct skin contact with liquid resins and hardeners. Keep your workspace clean to avoid cross-contamination of your Dragon Scale Resin tools.
Proper disposal of waste materials is a tactical necessity for your Dragon Scales Diy shop. Resin-soaked wipes can generate heat and pose a fire risk if not handled correctly. Work on a silicone mat to catch spills and protect your furniture. This setup makes cleaning your Dragon Scale Mold easier after the pour cures. Maintain a dedicated space for your Cosplay Dragon projects to keep chemicals away from living areas.
Selecting The Right Dragon Scale Mold For Your Coasters
Silicone Mold Benefits
Silicone is the industry standard for producing a detailed Dragon Scale. This material offers the flexibility needed to demold complex geometric patterns without snapping the cured Resin Pour. High grade silicone captures micro textures that plastic molds miss. You need this precision for Handmade Dragon Coasters to ensure light hits every ridge correctly. Silicone also withstands the heat generated by the chemical reaction during the curing process.
Durability and release properties make silicone essential for any Dragon Scales Diy project. The non stick surface eliminates the need for heavy release agents which can cloud the final finish of your Dragon Scale Resin. You can reuse quality silicone molds hundreds of times if you clean them properly. Professionals choose platinum cure silicone for its long term stability and resistance to tearing when removing a thick Cosplay Dragon piece.
Brown Mold Selection
Search for a Brown Dragon Scale Mold to achieve superior visual results. The dark pigment in the silicone provides high contrast against the clear or colored resin. This contrast allows you to spot trapped air bubbles before the resin sets. Finding a specific Brown Dragon Scale Mold helps you verify that every crevice of the Dragon Scale Mold is filled. Visibility is your primary defense against surface defects.
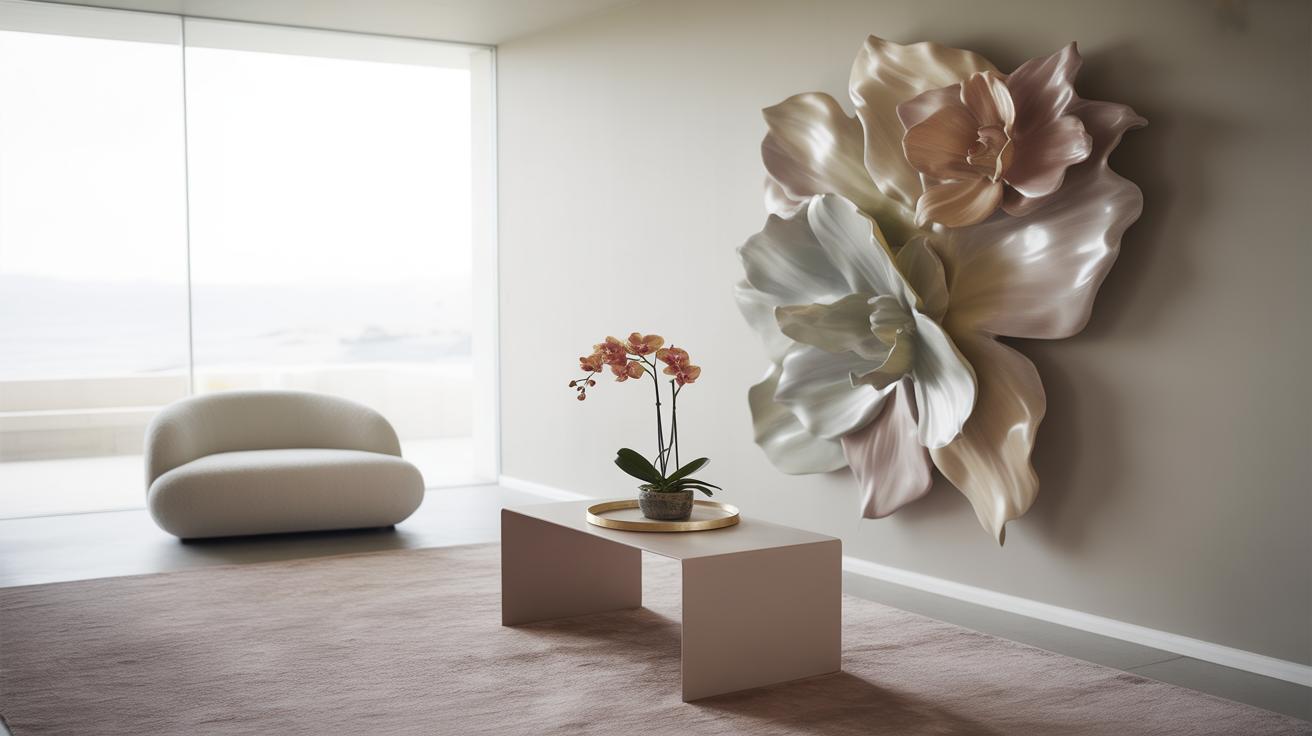
Depth and overlap are critical when selecting your Dragon Scale Mold. A shallow mold results in flat discs that lack the biological realism of actual reptilian armor. Look for molds where the scales stack significantly to create natural shadows. This depth is vital for Diy Dragon Scales that need to look authentic. Proper mold depth ensures your Handmade Dragon Coasters have the structural integrity to survive daily use.

Mastering The Dragon Scales DIY Technique
Mixing Ratios
Precision fuels the success of Dragon Scale Resin projects. You must follow the manufacturer instructions for volume or weight ratios exactly. Most epoxy systems use a two to one or one to one ratio. Use clear measuring cups to verify levels at eye height. Inaccurate measurements prevent the Resin Pour from curing. This leaves your Dragon Scale tacky and ruins the structural integrity required for durable coasters.
Mix the components slowly for three full minutes to ensure a complete chemical bond. Scrape the sides and bottom of the container frequently. Poorly mixed batches create soft spots that destroy the detail in your Brown Dragon Scale Mold. Consistent mixing is the only way to achieve the high clarity needed for Dragon Scales Diy. Proper ratios guarantee your Handmade Dragon Coasters withstand heat and daily use without yellowing.
Bubble Prevention
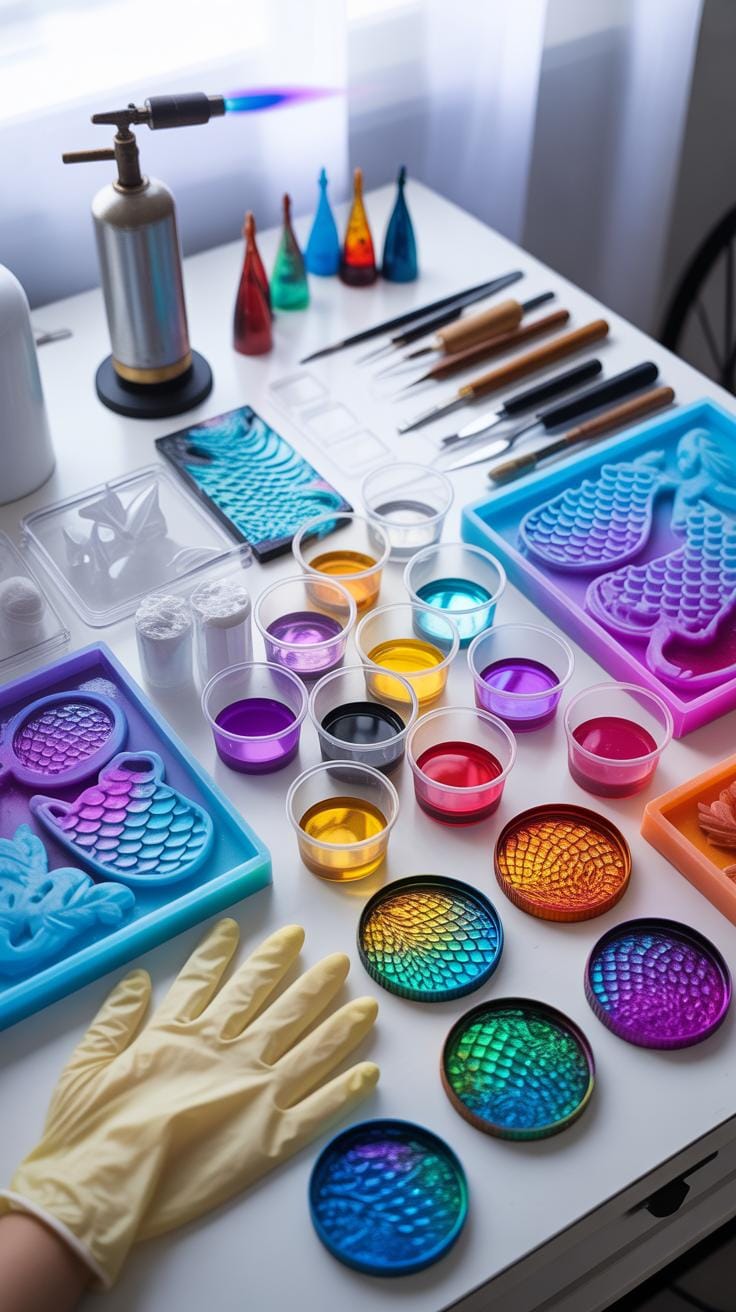
Trapped air destroys the sharp edges of a Dragon Scale Mold. Heat is your primary tool for removal. Use a propane torch or heat gun briefly over the surface after the pour. This pops surface bubbles that obscure the texture. For deep cavities used in a Cosplay Dragon piece, pour the resin in thin stages. This allows air to escape naturally before the material thickens and traps oxygen.

Vacuum chambers offer the best results for Diy Dragon Scales by pulling all air out of the liquid. If you lack professional equipment, let the mixed resin sit for five minutes before pouring. This allows large bubbles to rise and pop. Slow pouring down the side of the container also prevents air entrapment. Follow these steps to ensure your Dragon Scale Resin looks professional and remains free of visible defects.
Expert Tips For A Vibrant Resin Pour Process
Color Layering Steps
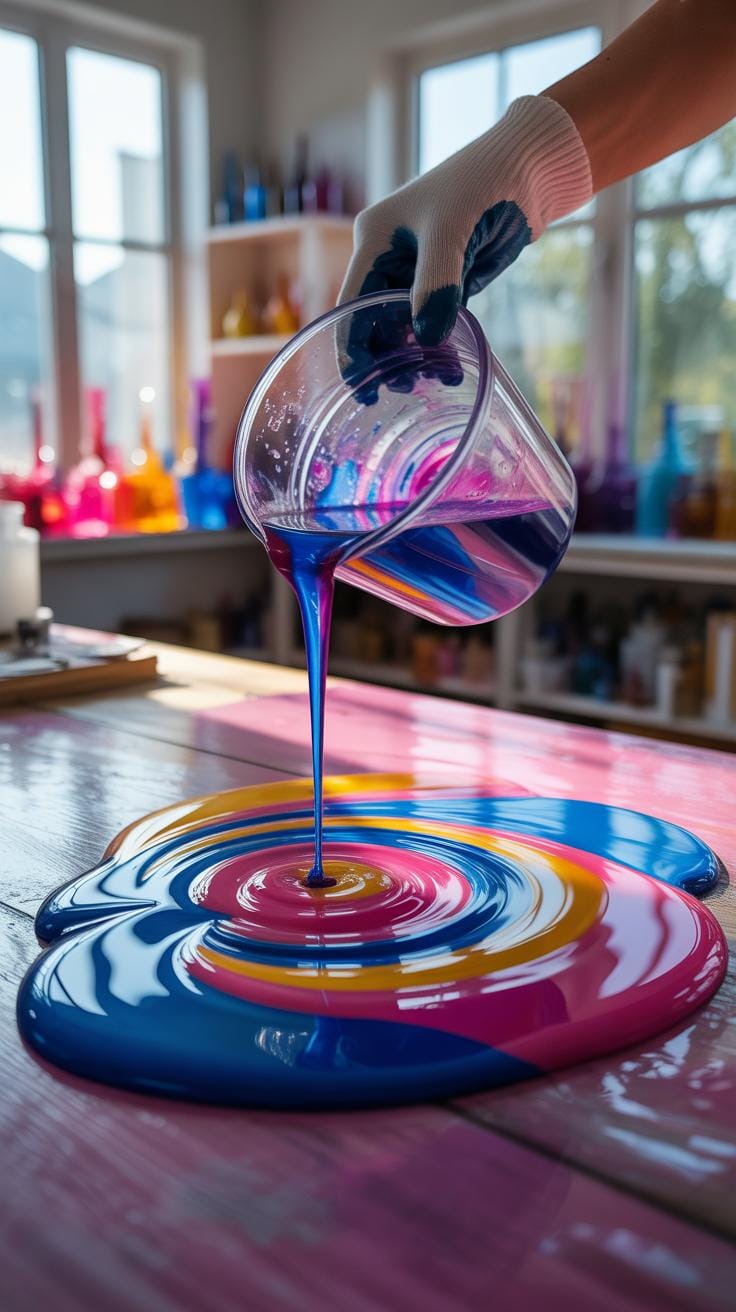
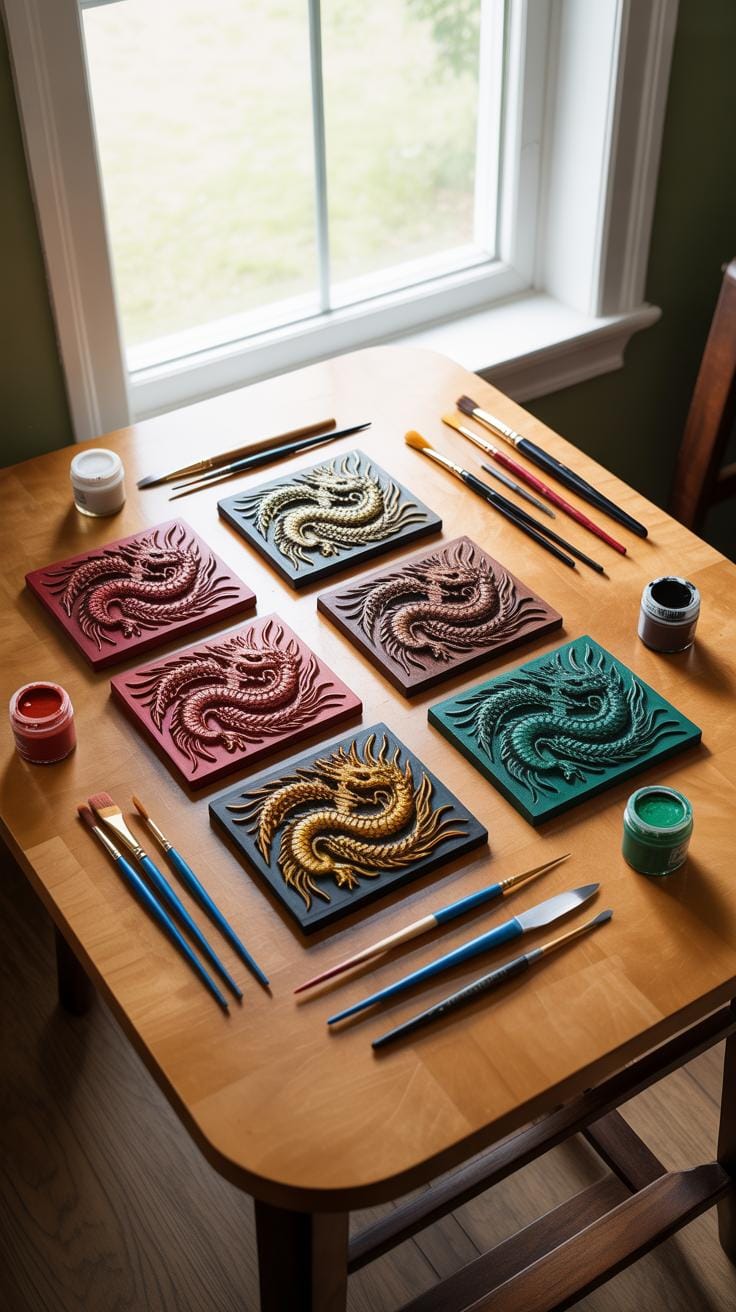
Achieving depth in your Dragon Scale Resin requires a strict layering sequence. You must control the viscosity of your resin to prevent colors from muddying. Start by preparing your Dragon Scale Mold with a thin dusting of pigment before the first pour. This technique ensures that the ridges of the Handmade Dragon Coasters catch the light. Precise timing between layers creates the realistic 3D effect needed for professional results.
- Surface Dusting: Apply dry pigment directly to the Brown Dragon Scale Mold using a soft brush. This step defines the edges of each scale and creates immediate contrast once you finish the Resin Pour.
- Base Tinting: Mix a translucent dye into your first batch of resin. This layer provides the underlying hue for your Dragon Scale without blocking the light from reaching the deeper sections of the mold.
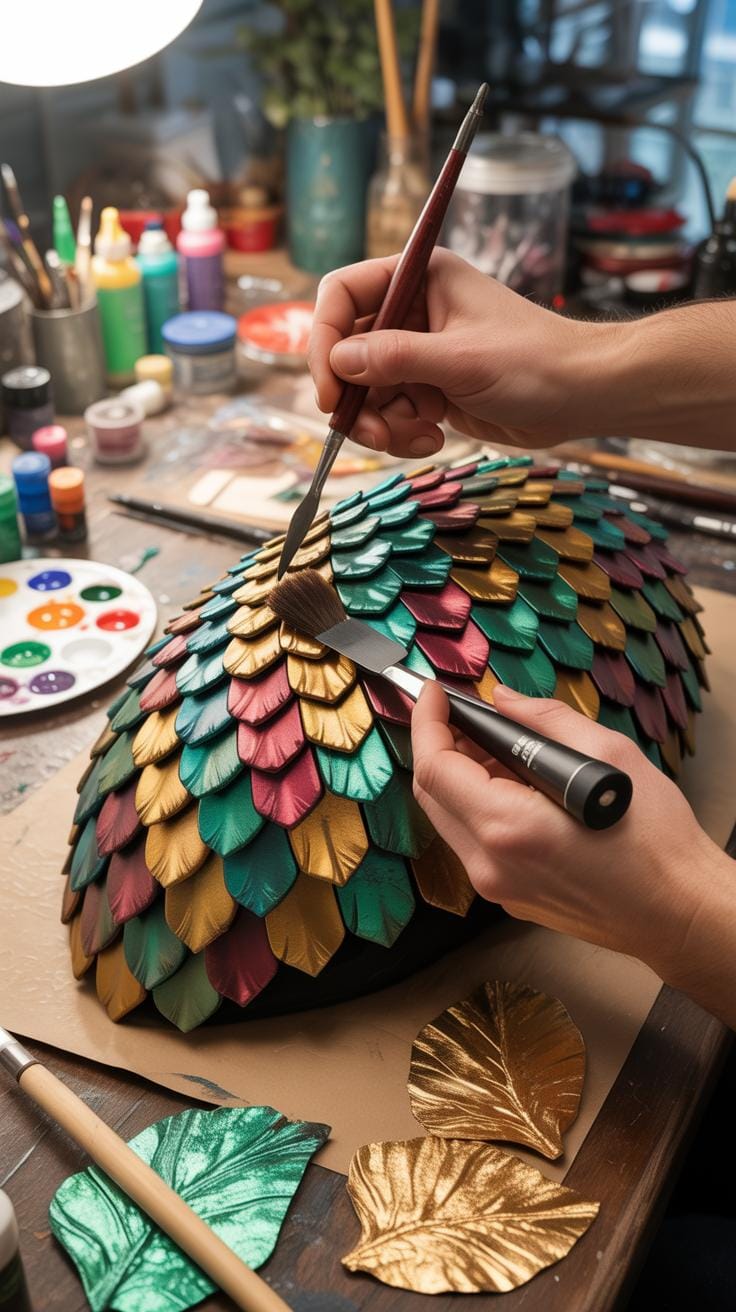
- Metallic Highlighting: Use a high-density metallic powder for the second layer to simulate biological armor. This specific step is vital for a Cosplay Dragon look where the scales must appear hard and reflective.
- Opaque Backing: Pour a final dark or opaque layer to seal the piece. A dark backing prevents light from washing out the colors and makes the Diy Dragon Scales look thick and substantial.
- Air Bubble Removal: Pass a heat gun quickly over the surface after each layer. Trapped air ruins the texture of Dragon Scales Diy projects and breaks the visual flow of the shimmering scale pattern.
Layering correctly transforms a flat casting into a dynamic piece of art. Monitor the cure state of each layer to ensure a chemical bond without total blending. This structural approach is the standard for high-end Resin Pour applications. Follow this order to produce consistent Handmade Dragon Coasters that meet professional quality standards for collectors and enthusiasts who demand realism and durability.
Pigment Types
Choosing the right colorant dictates the final texture of your Dragon Scale. Mica powders offer a shimmering, pearlescent finish that mimics natural obsidian or reptile hide. These powders sit on the surface of the resin and reflect light. They work best in a Brown Dragon Scale Mold when you want to emphasize the repeating geometric patterns of the scales through high-contrast reflections.
Alcohol inks behave differently by providing transparency and fluid movement. Use these inks if you want your Dragon Scale Resin to look like glass or gemstones. Inks allow light to pass through the Dragon Scale, creating internal glows. This choice is critical for a Cosplay Dragon prop that needs to look magical or organic rather than metallic. Avoid mixing too much ink as it can inhibit the curing process.
Achieving The Perfect Iridescent Dragon Scale Aesthetic

Chameleon Powders
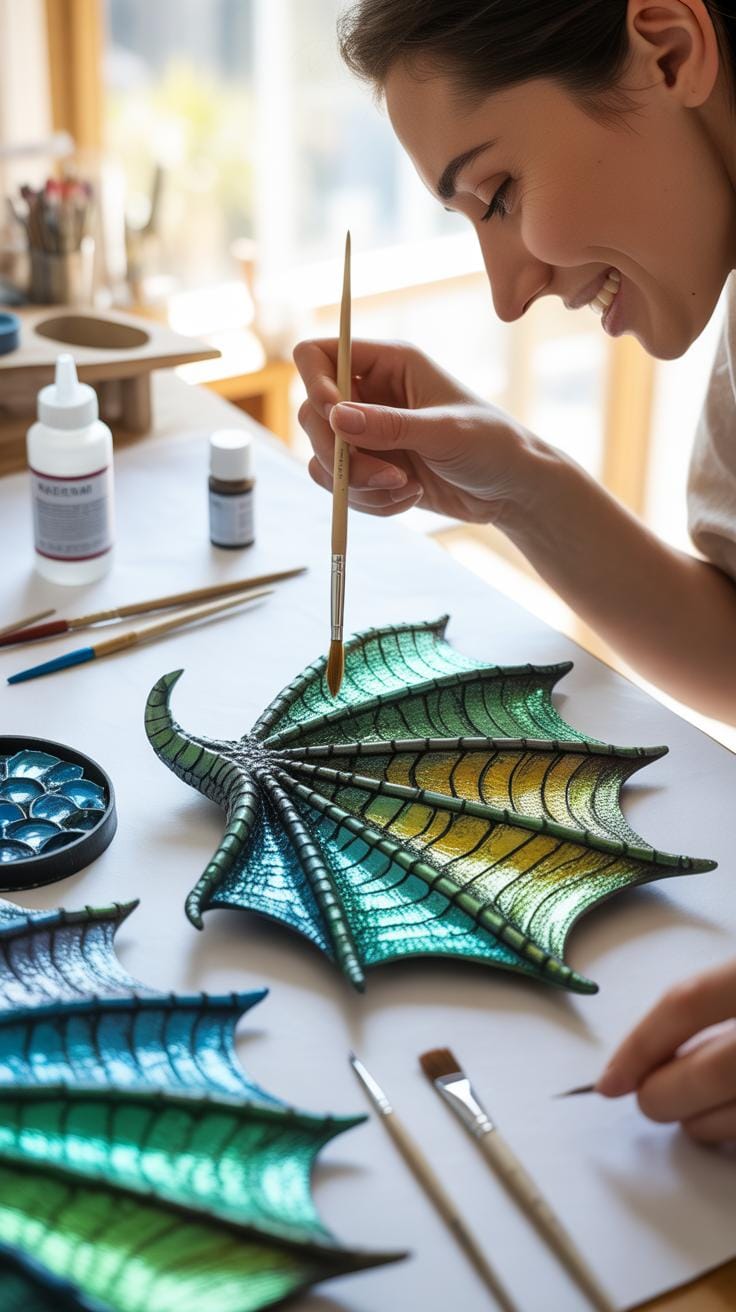
Chameleon powders mimic biological iridescence found in nature by shifting colors based on light angles. You must apply these powders directly to your Dragon Scale Mold before the Resin Pour to lock in the color. Use a dry brush to coat the mold surface evenly. This technique ensures that your Handmade Dragon Coasters reflect light like actual reptile skin. Darker bases provide the best contrast for these powders.
Using a Brown Dragon Scale Mold with these powders creates a grounded and organic look. This aesthetic works well for high-end props or a Cosplay Dragon project where realism is the goal. Avoid mixing the powder directly into the liquid resin as this often dulls the color shift effect. Coat the mold first to keep the finish crisp. This step is vital for high-quality Dragon Scale Resin results.
Glitter Placement
Strategically placing glitter adds internal depth to your Dragon Scale project. Use larger hex glitter pieces to represent individual scales within the layers of resin. Drop these pieces into the mold during the first half of the Resin Pour process. This positioning creates a three-dimensional effect that flat paint cannot achieve. Proper placement makes your Diy Dragon Scales look thick and armored rather than thin and plastic.
Heavy glitters will sink to the bottom of the mold during the curing process. Use this physical property to your advantage to concentrate color at the tips of each Dragon Scale. If you want a uniform look, wait for the resin to reach a honey-like consistency before adding your glitter. This ensures the material stays suspended. Achieving professional Dragon Scales Diy results requires mastering these specific weight and timing variables.
Creating Professional Handmade Dragon Coasters
Curing Times
Properly setting your Dragon Scale Resin requires strict temperature control and patience. Most epoxy systems need 24 hours to reach a hard state, but cold climates slow this process significantly. High humidity can cause a sticky surface or cloudy finish on your Dragon Scale. Always maintain a steady environment to ensure the chemical reaction completes effectively for high quality Handmade Dragon Coasters.
Wait for the Resin Pour to stop feeling tacky before you move the piece. Moving it too early ruins the internal pattern of the Dragon Scale. Heat lamps or curing boxes can speed up this stage during winter months. Consistency is the secret to strong DIY Dragon Scales. If you rush the clock, you risk permanent fingerprints or warping that ruins the final coaster set.
Like the mythical beasts of our childhood stories, your hands can turn simple resin into a kaleidoscope of shimmering legend. Each scale you craft is a small piece of magic held forever in the light of your own imagination.
— Ray Bradbury
Demolding Art
Extracting your work from a Brown Dragon Scale Mold requires a steady hand and zero force. If the resin is still soft, you will deform the sharp ridges of the Dragon Scale. Use a drop of mold release or soapy water around the edges to break the vacuum seal. This protects the Dragon Scale Mold from tearing and ensures your Cosplay Dragon projects look professional.
Carefully peel the silicone back from the edges of the DIY Dragon Scales first. Do not pull from the center or you might snap the thin edges of the resin. Once the air gap forms, the coaster should slide out with minimal resistance. This technique keeps the finish glass like and preserves the intricate details for your next Resin Pour. Proper demolding extends the life of your equipment.
How DIY Dragon Scales Can Enhance Your Cosplay Dragon Kit

Cosplay Integration
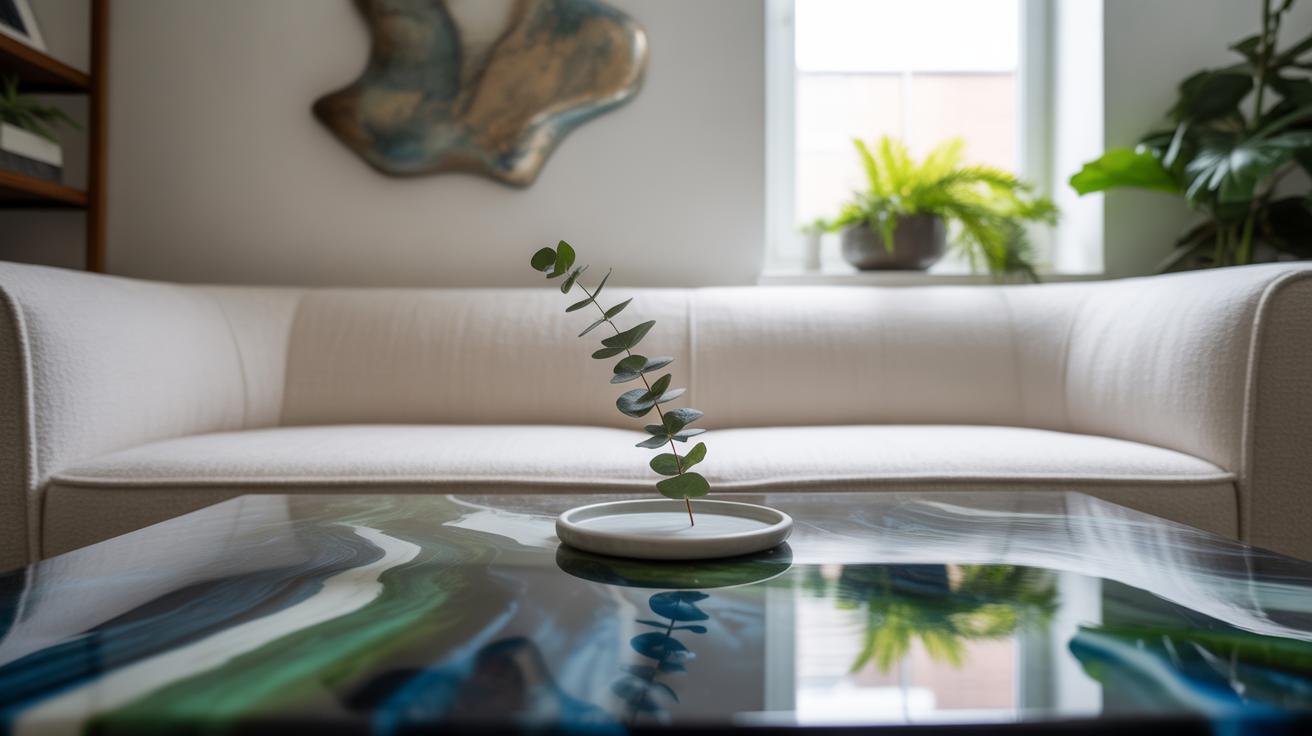
Integrate your handmade dragon coasters directly into a cosplay dragon kit to improve character realism. These resin pieces function as durable armor plating for bracers or shoulder pauldrons. You can attach a finished dragon scale to leather or fabric backing using industrial adhesives. This method creates a modular look that mimics natural biological growth. Use a high quality resin pour to ensure each individual piece remains lightweight for long events.

Standard diy dragon scales allow for easy replacement if gear breaks during a convention. You can cast specific shapes using a dragon scale mold to fit curved surfaces on your body. Professional cosplayers use dragon scale resin because it resists impacts better than foam or thermoplastic. Match the pigment of your costume accessories to your coaster set for a unified appearance. This tactical approach turns functional home decor into high end costume components.
Matching Props
Establish architectural consistency by utilizing the same brown dragon scale mold for both furniture and handheld props. A cohesive visual theme separates amateur builds from professional grade gear. If your coasters feature a specific iridescent sheen, apply that same finish to your staff or shield. Using dragon scales diy techniques ensures every item in your kit looks like it came from the same creature. This consistency builds a believable world for your character.
Advanced makers coordinate their resin pour schedules to ensure color batches match perfectly across all items. A single dragon scale can serve as a reference point for weathering and highlighting larger armor sections. If you produce handmade dragon coasters with specific gold leaf inclusions, repeat that detail on your sword hilt. This strategy tethers your environment to your persona. Reliable results come from using a dedicated dragon scale resin for every component in your collection.
Finishing And Protecting Your DIY Dragon Scales Projects
Sanding Edges
Properly finishing your Dragon Scale Resin project requires removing the sharp flash left by the Dragon Scale Mold. Start with 240-grit wet sandpaper to level the perimeter of your project. Shift to higher grits sequentially to remove scratch patterns left by the previous paper. Maintain a consistent circular motion to ensure the Dragon Scale pattern remains uniform. Use a steady stream of water to prevent dust inhalation.
Achieving a glass-like finish on your Handmade Dragon Coasters entails polishing after the final sanding stage. Use a high-quality polishing compound with a microfiber cloth to buff the surface. This step clarifies the Resin Pour and highlights the depth of the Diy Dragon Scales. Proper finishing ensures your Cosplay Dragon accessories look professional. Skip this step and your project will look amateur. A smooth edge prevents skin irritation during use.
Heat Resistance
Standard epoxy will soften under a hot coffee mug. You must apply a specialized heat-resistant top coat to your Dragon Scale project for practical utility. This barrier protects the Dragon Scales Diy work from ring marks and warping. Use a high-viscosity resin formulated for temperatures up to 500 degrees Fahrenheit. Pour this clear layer slowly to avoid trapping bubbles over your intricate scale textures.
A durable top coat transforms decorative pieces into functional tools. This protective layer ensures your Brown Dragon Scale Mold results remain crisp over time. Apply the resin in a dust-free environment to maintain total clarity. This final step is non-negotiable for anyone making functional items. It preserves the integrity of the Dragon Scale design during daily use. Tactical application ensures your work lasts for years without degrading.
Frequently Asked Questions

What exactly are resin dragon scales and how do you achieve the textured look?
Creating resin dragon scales involves a specialized layering technique where you use teardrop-shaped silicone molds or scale-patterned inserts. By pouring high-quality epoxy resin over these textures and incorporating color-shifting pigments, you mimic the iridescent sheen of mythical creatures. This beginner-friendly project allows you to experiment with depth and light, resulting in functional pieces of art that look like they were harvested directly from a fantasy realm.
How do I create a realistic gradient effect when pouring my coasters?
To achieve a professional gradient, start by mixing your resin dragon scales colors in separate cups using alcohol inks or mica powders. Begin pouring at the outer edges with darker tones, slowly moving toward a lighter center. Use a toothpick or fine brush to gently swirl the boundaries where the colors meet. This technique ensures a seamless transition that emphasizes the individual “scales” while maintaining a cohesive, magical aesthetic.
Can I make these colorful coasters without buying expensive professional equipment?
Absolutely! While professional kits exist, you can create stunning resin dragon scales on a budget by using standard clear epoxy and affordable silicone scale mats. Instead of pricey specialized dyes, try using cosmetic-grade eyeshadow or inexpensive chameleon powders to get that signature shimmer. As long as you have a flat surface, safety gear, and a steady hand, you can craft high-end home decor without a massive financial investment.